DIY: Industrial Curtain Rods
Happy Spring everyone! I want to share a fun, DIY project that we did for the master bedroom; our industrial inspired curtain rods. I've seen a few different versions on Pinterest, but wanted to put our own spin on this trend.
Not only can you tackle this project in one-day, you can do it without breaking the bank!
DIY Industrial Curtain Rods

Time: 1.5 hours of prep, 30 minutes for install
Cost: $30 per curtain rod, with (2) mounts
Skill Level: Basic tools, comfortable on a ladder
The need for this project became pretty apparent when I started shopping for a curtain rod that would span our four, street facing windows. Holy hat! Extra long curtain rods are expensive! And since we moved in this past weekend (YAHH!), we had to figure out a quick solution.
Determine how long of a curtain rod you want. Will the rod cover one window, two or span the length of several, like mine?
Not only can you tackle this project in one-day, you can do it without breaking the bank!
DIY Industrial Curtain Rods
Time: 1.5 hours of prep, 30 minutes for install
Cost: $30 per curtain rod, with (2) mounts
Skill Level: Basic tools, comfortable on a ladder
The need for this project became pretty apparent when I started shopping for a curtain rod that would span our four, street facing windows. Holy hat! Extra long curtain rods are expensive! And since we moved in this past weekend (YAHH!), we had to figure out a quick solution.
I reasoned with spending a little more on the curtains themselves because they had to be lined (not too sheer or see through) and 84" long, but I couldn't wrap my head around spending hundreds on hardware.
Step 1:
Check out inspiration online (Pinterest, duh) or in person if you can. There is absolutely no sense in doing all this work and not being totally stoked on the finished product.
I'm a very visual person, so I visited our friends Stephanie + Mike who recently installed similar black pipe curtain rods throughout their entire house, and they look awesome, so I had some pretty solid inspiration! I consulted with Mike, and I'll share his tips as we go.
Step 2:

Determine how long of a curtain rod you want. Will the rod cover one window, two or span the length of several, like mine?
 |
| Sketch a quick design plan. |
Make a quick sketch of the window. Measure the width of your window(s) including the trim around the window. Then measure again. Then wait a bit, think it through and measure again.
Half kidding, but a practical tip. Because the rod itself will not be cut by you (at home), and you cannot re-cut it due to personal error (unless you want to spend more money), your detailed measurements and drawing will be a helpful reference when you need it most.
Here's where you have to do a little, forward design prepping. You need to make two decisions:
1. How far beyond the window trim would you like the end of the rod or curtain to extend? For me, I decided on a simple 2" on each ends = 4" total. If you want the curtain to have a lot of extra room on the outer edge of the window when open, make sure you compensate for more.
1. How far beyond the window trim would you like the end of the rod or curtain to extend? For me, I decided on a simple 2" on each ends = 4" total. If you want the curtain to have a lot of extra room on the outer edge of the window when open, make sure you compensate for more.
Now add those extra inches to the overall width measurement and this will account for a decorative overhang on the ends.
2. How far out from the wall does the curtain need to hang to clear the window sill and trim? Here again, 2 inches was enough.
2. How far out from the wall does the curtain need to hang to clear the window sill and trim? Here again, 2 inches was enough.
Step 3:
Purchase and cut. Assuming you do not own a pipe cutting machine, you will need to seek professional assistance. With measurements in hand, head to your favorite home improvement store.
I do not recommend going on a Saturday at 11:00am, because every weekend warrior/ DIYer will also be there. Try to go before 9am or at an off-peak hour like dinner time.
Depending on how many curtain rods you're making, the pipe cutting process can take awhile to complete, and you'll stand there feeling dumb/helpless, so bring your best attitude and a coffee.
Step 4:
OK, so your at Home Depot (Lowe's / local hardware store). Head to the plumbing aisle, and look for a large machine in the middle of the aisle that looks like this.
 |
| Pipe cutting machine. |
This is a pipe cutting machine. Find an Associate (AKA your new BFF, or in my case, Frank) and tell Frank you need some pipes cut to length. Frank may assume that you are installing or replacing a natural gas line, to which you can mention your intentions with his pipes (assuming he has a sense of humor) are "decorative." In my case, I got a laugh. Work on your delivery.
At this time, look at the shelves above the Associate and you'll notice two types of pipes. Galvanized steel (silver) or black steel. Determine which one best works with your style/decor, and tell the Associate, "I need 1/2 inch {galvanized or black} pipe, threaded on both ends."
These pipes come in many different diameters, but 1/2 inch is plenty thick/strong to handle fabric curtains.
These pipes come in many different diameters, but 1/2 inch is plenty thick/strong to handle fabric curtains.
 |
| My new BFF, Frank. |
Hand your new bestie your beautifully, chicken scratch drawing and review the measurements together. (Remind yourself that you are not his first DIYer and you're way more sophisticated than the man he just spent 45 minutes helping make a PVC table - true story.)
From the drawing, the Associate will understand how much pipe is necessary for the full job, and will measure and cut a long (likely 10 foot) piece to your desired dimensions. Each 10 foot pipe is about $15-$20.
Similarly, have the Associate cut a zinc threaded rod into 2 inch sections. You will need (1) 2 inch section per mount. If you're only making (1) curtain rod, you'll have a bunch left over, but I'm sure you'll find something crafty to do with it.
Now stand back and watch your BFF in action!
Step 4:
Aside from the pipe, you will need some additional hardware for installation. Because we decided to use galvanized pipe, we matched the hardware with galvanized fittings. At Home Depot the fittings are color coded, so for this project, we were looking for 1/2 inch (pink coded) fittings.
Which ever metal you choose, feel free to mix and match the finish, just make sure you buy 1/2 inch fittings.

Here is what you will need to replicate our curtain rods. This list is per curtain rod (direct links are provided for purchase through Amazon):
Step 5:
With your purchases in hand, wave Frank goodbye and tell him if this project doesn't kill you, you hope to see him soon. To which Frank will promptly take his coffee break and pray that blogs like this don't get "repinned" too often.
Back at the ranch, start by laying out all of your purchases. If you haven't noticed by now, steel pipes and pipe cutting is accompanied by lots of grease and oil. This grease and oil will stain your pretty new curtains, so here's a good tip from my friend Mike:
Make sure you clean the hell out of them with a strong degreaser or household cleaner like 409. Any product made for cleaning kitchen grease will help. Make sure to get in all the threads really well.
Step 6:
Gather your tools for installation:

Step 7:
Decide on your curtain before installation. Start by manually test hanging the curtain on the rod and holding the rod up to your desired height and ensure it falls correctly. A friend is helpful here! Man, where's Frank when you need him. Depending on your curtain's length, determine where you would like the rod to live.
Here's my tip. Don't over complicate this. Simply eye ball the location of where you want the wall mount to be and determine the approximate location above the trim.
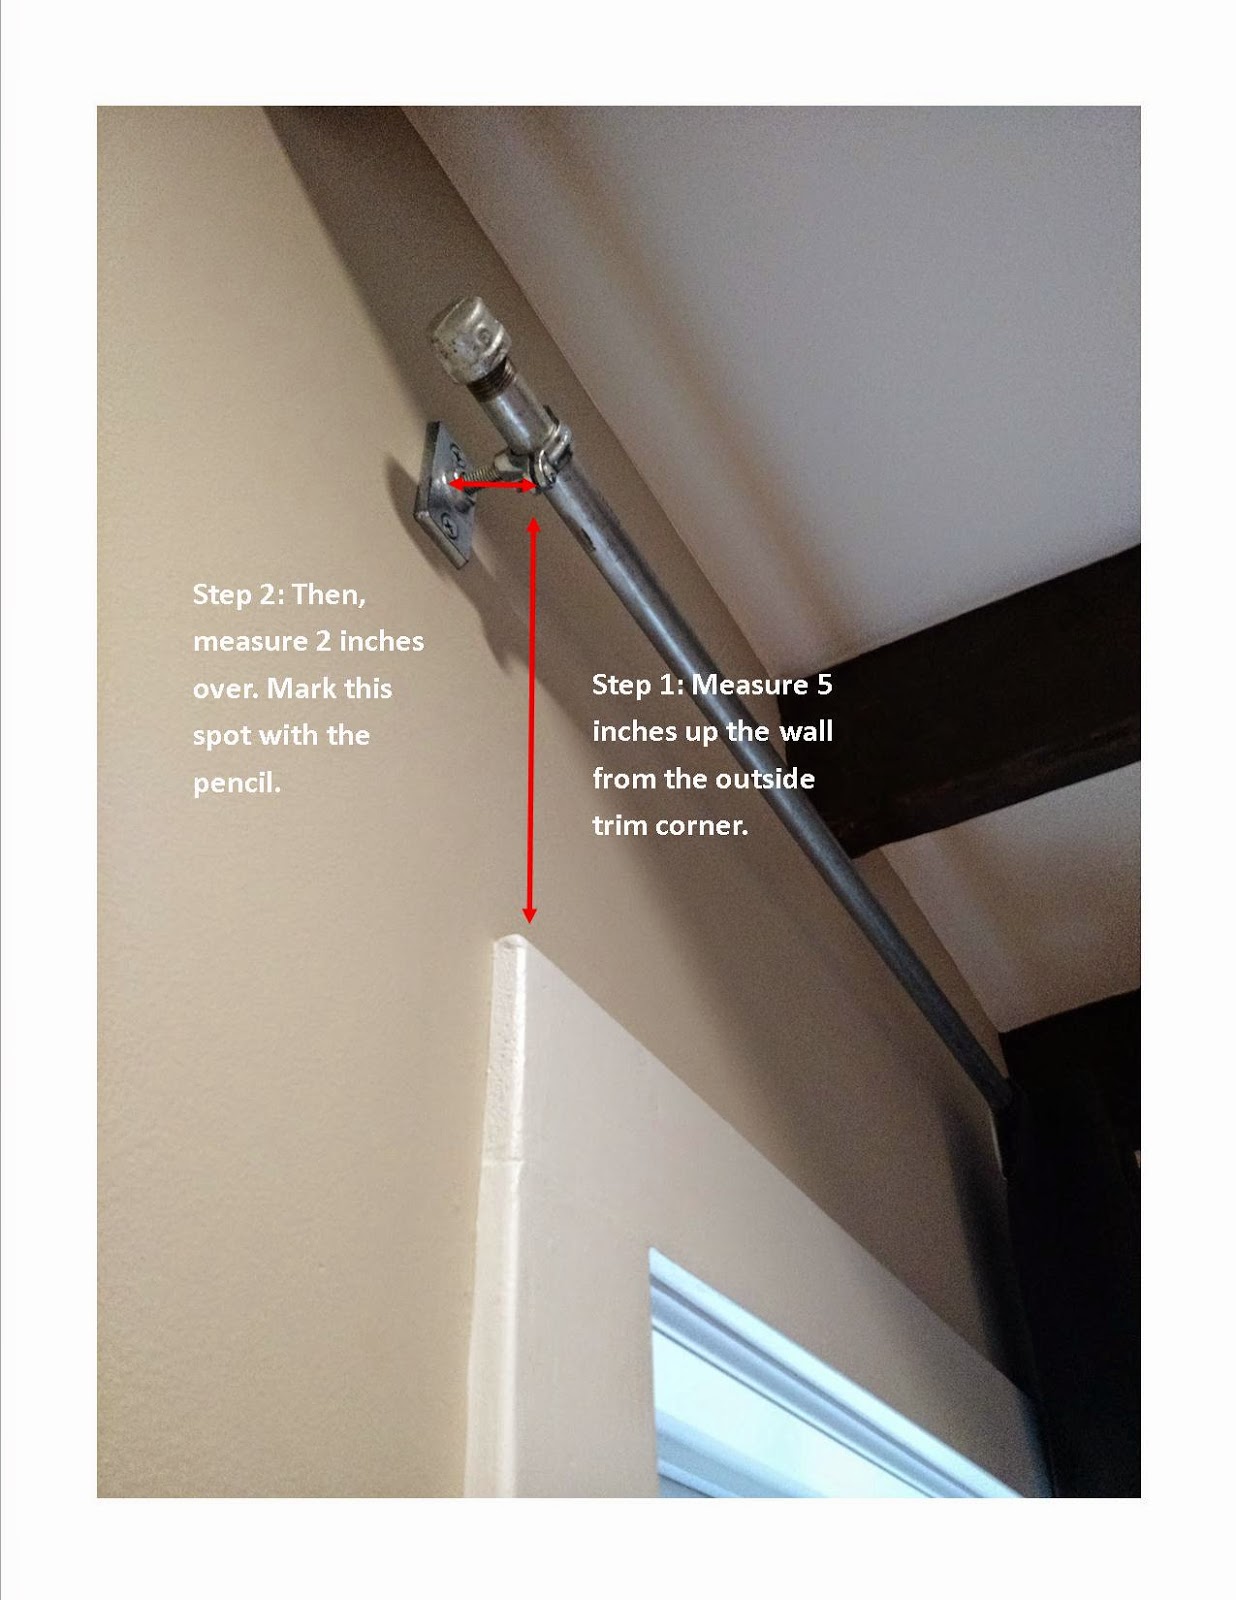
Take a look below. I wanted the curtain to be much higher, so I measured up from the corner of the trim 5 inches and over 2 inches. Mark this center spot with an "x". This center spot will be the middle of the wall plate's center opening and directly in line with the threaded rod.
Holding up the wall plate to the wall, center your "x" on the middle opening, and use your level on the side of the plate to ensure the plate is vertically straight. Once straight, use your pencil to trace the top and bottom openings onto the wall.
Top opening: Screw
Middle: Threaded rod
Bottom: Screw
Repeat this above process on both sides of the window.
Step 8:
Now that you have the location of the wall plates marked, you will need to determine how lucky you are and if there is a wall stud to mount the plate to. You can determine this with an electric stud finder. ** If you're my husband, you've placed the stud finder on your chest and are now beeping loudly.
If there is no stud, a dry wall anchor will be necessary.

Step 9:
If there is a stud, drill a pilot hole through the top and bottom circle marks you just made and secure the plate to the wall with the wood screws.
Thread the 2 inch rod piece into the center opening and add the split ring hanger to the threaded rod end. Be sure not to over thread, as the pipe will need to fit in the open space between.
Repeat this step on each side.
Step 10:
If the curtain rod is long, find your friend again. With the pipe dressed with your curtain, loosen the split ring, place the pipe in between and tighten the outer ring screw making a secure closure on both sides.
Finally, thread on the end caps for a finished, industrial look.


All in, each curtain rod with (2) matching mounts cost approximetly $30 and 30 minutes of installation.
I will admit John was my project buddy and helped guided me through this process but I feel completely confident, having only done this once, that you could easily follow these steps & do it too!
From the drawing, the Associate will understand how much pipe is necessary for the full job, and will measure and cut a long (likely 10 foot) piece to your desired dimensions. Each 10 foot pipe is about $15-$20.
Similarly, have the Associate cut a zinc threaded rod into 2 inch sections. You will need (1) 2 inch section per mount. If you're only making (1) curtain rod, you'll have a bunch left over, but I'm sure you'll find something crafty to do with it.
Now stand back and watch your BFF in action!
Step 4:
Aside from the pipe, you will need some additional hardware for installation. Because we decided to use galvanized pipe, we matched the hardware with galvanized fittings. At Home Depot the fittings are color coded, so for this project, we were looking for 1/2 inch (pink coded) fittings.
Which ever metal you choose, feel free to mix and match the finish, just make sure you buy 1/2 inch fittings.
Here is what you will need to replicate our curtain rods. This list is per curtain rod (direct links are provided for purchase through Amazon):
- (2) Split-Ring Pipe Hangers
- 3/8 x 36" Zinc Threaded Rod
- (2) 3/8 Ceiling Plate; used here as a wall plate
- (2) Iron Caps
- (4) #12 x 2 inch screws
- Dry wall anchors (optional) ($7.00 for a 10 pack)
 |
| Top: Split ring pipe hanger. Bottom: 3/8 inch zinc threaded rod cut into 2" sections |
 |
| 3/8 ceiling plate, used her as a wall plate. |
 |
| 1/2 inch galvanized iron cap |
With your purchases in hand, wave Frank goodbye and tell him if this project doesn't kill you, you hope to see him soon. To which Frank will promptly take his coffee break and pray that blogs like this don't get "repinned" too often.
Back at the ranch, start by laying out all of your purchases. If you haven't noticed by now, steel pipes and pipe cutting is accompanied by lots of grease and oil. This grease and oil will stain your pretty new curtains, so here's a good tip from my friend Mike:
Make sure you clean the hell out of them with a strong degreaser or household cleaner like 409. Any product made for cleaning kitchen grease will help. Make sure to get in all the threads really well.
 |
| Make sure you degrease ALL of the parts and hardware really well. |
Gather your tools for installation:
- Ladder
- Measuring tape
- Level
- Pencil
- Painters/ non-stick tape (as opposed to writing on the wall, painters tape is an easier way than marking up the wall)
- Drill
- Phillips-head Screw driver
- Stud finder
Step 7:
Decide on your curtain before installation. Start by manually test hanging the curtain on the rod and holding the rod up to your desired height and ensure it falls correctly. A friend is helpful here! Man, where's Frank when you need him. Depending on your curtain's length, determine where you would like the rod to live.
Here's my tip. Don't over complicate this. Simply eye ball the location of where you want the wall mount to be and determine the approximate location above the trim.
Take a look below. I wanted the curtain to be much higher, so I measured up from the corner of the trim 5 inches and over 2 inches. Mark this center spot with an "x". This center spot will be the middle of the wall plate's center opening and directly in line with the threaded rod.
Holding up the wall plate to the wall, center your "x" on the middle opening, and use your level on the side of the plate to ensure the plate is vertically straight. Once straight, use your pencil to trace the top and bottom openings onto the wall.
Top opening: Screw
Middle: Threaded rod
Bottom: Screw
Repeat this above process on both sides of the window.
Step 8:
Now that you have the location of the wall plates marked, you will need to determine how lucky you are and if there is a wall stud to mount the plate to. You can determine this with an electric stud finder. ** If you're my husband, you've placed the stud finder on your chest and are now beeping loudly.
If there is no stud, a dry wall anchor will be necessary.
Step 9:
If there is a stud, drill a pilot hole through the top and bottom circle marks you just made and secure the plate to the wall with the wood screws.
Thread the 2 inch rod piece into the center opening and add the split ring hanger to the threaded rod end. Be sure not to over thread, as the pipe will need to fit in the open space between.
 |
| Wall plate secured with screws, center threaded rod screwed in. |
 |
| Be sure not to over thread the split ring, and leave plenty of room for the 1/2 inch pipe to pass through. |
Repeat this step on each side.
Step 10:
If the curtain rod is long, find your friend again. With the pipe dressed with your curtain, loosen the split ring, place the pipe in between and tighten the outer ring screw making a secure closure on both sides.
Finally, thread on the end caps for a finished, industrial look.
All in, each curtain rod with (2) matching mounts cost approximetly $30 and 30 minutes of installation.
I will admit John was my project buddy and helped guided me through this process but I feel completely confident, having only done this once, that you could easily follow these steps & do it too!
Comments